

![Inviting new users & setting their privileges [video]](https://uploads-us-west-2.insided.com/copper-en/attachment/d5d5a752-84ac-412d-9b04-0f4d21352cb7_thumb.png)

Note: As of March 2022, Opportunities in the Copper left-hand menu is changing to Pipelines. Click here for more information.
Who can invite users?
Generally, the Account Owner invites new users. However, the Account Owner can also enable Admins to invite new users on their behalf. To do this, the Account Owner needs to:
- Open the Copper web app and go to Settings > Account Settings > Company & Invite New Users.
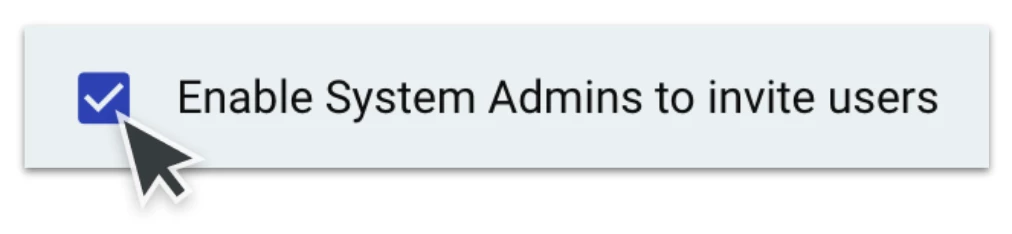
- Check the box called Enable System Admins to invite users.
Inviting a new user
So you’re ready to invite new users to your Copper system - great! Just follow the steps below.

- Open the Copper web app and go to Settings > Account Settings > Company & Invite New Users.
- Click the Invite User button. A box will appear where you can enter the new user’s name and user name, as well as their account privileges. If you have Teams set up, you can also indicate which Team the users belongs on.
- Click Save to send the invitation.
The new user will receive an invitation to the Copper system via their email. If they don’t receive it, click the Resend button.
Account privileges
Here is a breakdown of what each account privilege means:
- System Admin: this gives access to all the admin settings in your Copper system, such as the ability to add custom fields or edit pipelines. If you think this user needs to configure Copper then check this box. If not, we recommend you leave it unchecked.
- Google Sync: this enables the Google integration so that the new user’s emails and calendar events are automatically synced to Copper. This is checked off most of the time, but if you do not want that user’s Google account to be synced with Copper then un-check this box. For example, a company executive may not need their emails synced whereas a sales rep working in their Copper pipeline might.
- Data Export: this enables the user to export data from Copper. They might need this ability if they want to run their own separate analysis. We recommend having this un-checked unless there is a specific reason they need the ability to download your Copper data into a spreadsheet.
- Dropbox: this enables the user to upload files directly from Dropbox onto a Person, Opportunity, etc.
You can also adjust these privileges later on. To do so, just return to Settings > Account settings > Company & Invite New Users and click the pencil icon beside a user.