


Getting Started
Welcome to Copper! 🎉
We are so excited to have you. Our goal is to enable you and your organization to:
✅ Manage your contacts
✅ Manage your deals
✅ Manage your projects
✅ Edit your personal preferences
This course is designed to teach you, a Copper user, how to user Copper's main features. If you have any questions, feel free to leave them in the comments below or post in our Community Forum!
Let's get started!
Getting Started with Copper
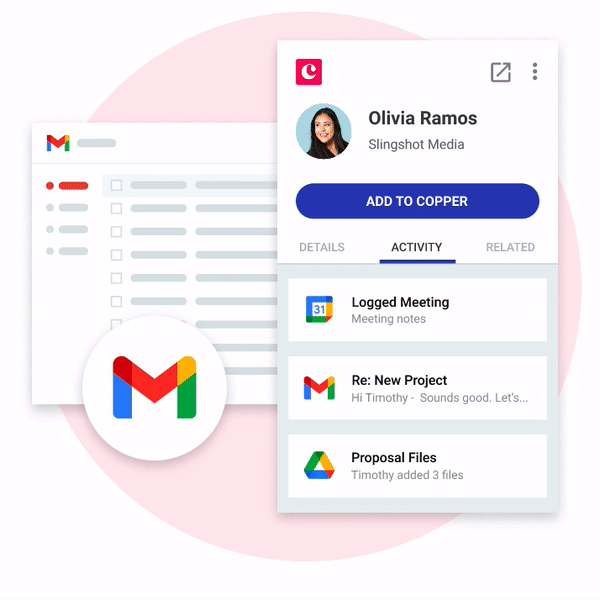
The first thing you should do is download and install our Chrome extension! This allows you to add contacts, manage deals, and complete tasks from within Gmail and Google Calendar!
✋ We strongly recommend installing our Chrome extension. This allows you to access Copper from within Gmail and Google Calendar!
If you’re often on the go, check out our mobile app for iOS and Android as well!
Understanding Copper
Webinar Registration
Similar to Admins, we recommend you start your journey with Copper by attending our weekly User Webinar. Everyone is welcome to attend this webinar, and you can attend it multiple times if it is beneficial to you.
| Terms | Definitions | Notes |
| Lead | Unqualified new relationship | Someone who submits an inquiry on your website, or a contact you intend to cold call |
| Company | A qualified organization within your business network | A way to group multiple People records by Company |
| Person | A qualified contact within your business network | People can be related to a Company |
| Opportunity | Revenue potential associated with a Person/Company | Opportunities can also represent any linear repeatable process you’d like to track - Not limited to sales deals |
| Project | A broad initiative to complete | Projects can be related to People, Companies, or Opportunities |
| Task | A single action item | Tasks can be related to Leads, People, Companies, or Opportunities |
Once you have completed the webinar, move forward with this guide!
Next up: Contact Management
Contact Management
Add a Person
People records are where you save information on your contacts and where your interactions with them are logged. They are similar to how you might have a contact in your phone, but supercharged with Copper's fields, email and activity logs, and related records.
To add a new Person to Copper, follow the steps below. You can also add People straight from your Gmail inbox with our Chrome Extension, which we'll cover in a separate course.

How to Add a Person:
1. Click on "People" in the menu bar
2. Click on the "Add New" button
3. Enter all of the necessary and mandatory fields
4. Click "Save" to add the new person
Add a Company
Adding a Company record in Copper helps you keep track of company information, as well as any interactions you or your team has had with anyone at that company.
Copper automatically matches People with their Companies using the email domain. For example, People with an email address "name@dundermifflin.com" will be associated with the Company that has "dundermifflin.com" as its email domain. You can also manually associate People with Companies if they use a generic email domain such as yahoo.com or gmail.com.
When you open a Company record, the activity feed will show activities involving any of its associated People. Very handy for tracking company-wide relationships!
To add a new Company, follow the steps below.

How to Add a Company:
1. Click on "Company" in the menu bar
2. Click on the "Add New" button
3. Enter all of the necessary and mandatory fields
4. Click "Save" to add the new company
Filter by Contact Type
Copper lets you categorize your People into Contact Types, such as Current Customer and Potential Customer. Then you can filter your People depending on which Contact Type they belong to. Follow the steps below to filter by Contact Type.

How to Filter by Contact Type:
1. Click on "People" in the menu bar
2. Click on the "Filter" icon on the right-hand side of the page
3. Select the "Contact Type" you wish to filter by
4. Save the filter by giving it a name and clicking "Save"
Note, the default Contact Types are Current Customer and Potential customer. Your Copper admin can also add custom Contact Types, such as Vendor, Influencer, Partner, Agent, or any other relationship you may want to categorize.
Send a Bulk Email
Bulk emails let you send the same email to multiple People or Leads at once. If you pair them with filters, you can send targeted emails efficiently. For example, you can send a Thank You email to all your current customers, or a follow-up email to all the Leads that came in through advertising.
Follow the steps below to send a bulk email.

How to Send a Bulk Email:
1. Click on "People" in the menu bar
2. Apply a filter to bring up a list of all the people you want to email
3. Use the multi-select checkbox to select all of the records on the list. Alternatively, you can manually check off select contacts to email.
4. Click on the "Compose Bulk Email" icon that will appear after selecting records
5. Enter a Subject Line and write out the body of your email
Log an Activity
Every Person and Lead record has an activity feed, where Copper stores information on your interactions. Copper automatically syncs any emails you have with those contacts, but you can also log other interactions such as phone calls or demos. This gives you a full picture of your relationship with that contact. When was the last time you spoke? Did somebody else on your team reach out to them? The activity log will give you a detailed history of your relationships.
Follow the steps below to log an activity.

How to Log an Activity:
1. Search for a person you would like to log an activity for using the quick-search bar, or select a person from your record list under people.
2. Under the "Activity" section select the activity type you would like to log
3. Enter in the activity notes
4. Adjust the date and time of the activity if necessary
5. Click "Save" to update the record and save the activity
Note, the default activity types are Phone Call, Meeting, and Busywork but your Copper admin can add additional activity types to tailor to your organization's activities.
Create and Add a Tag
Tags are a handy way to store tidbits of information about a Lead, Person or Company that don't belong in your other fields. For example, you can add a tag for everyone you met at a particular event. You can then use a filter, which we'll cover in the Reporting section, to send an email template to all those people at the same time.
To create a Tag, follow the steps below.

How to Create and Add a Tag:
1. Open the record you would like to add the tag for. In our example, we are opening a Person.
2. Under the "Details" section of the record scroll down to "Tags"
3. Type in the text field to add a Tag or select one from the dropdown of previously used tags
Contact Management Recap
Congratulations! You just learned how to:
- Add a Person to Copper so you can manage your relationship
- Add a Company to Copper so you can manage relationships company-wide
- Filter by Contact Type to see o report on specific types of relationships
- Use a bulk email to quickly send multiple personalize emails
- Log an Activity to keep track of your interactions and communications
- Create a Tag to segment your Leads and People
Next up: Deal management
Deal Management
Add a Lead
Leads are contacts who are not yet qualified. Your organization can use this section to store contacts that may or may not develop into relationships. You can think of it as your organization's phone book, whereas the Person section is a more qualified or tailored list of relationships.
When Leads become qualified, you can convert them into People and Opportunities. Opportunities help you keep track of any deals or processes involving that Person. We'll discuss them more in depth in an upcoming section.
Note, Copper admins can choose to de-activate the Leads section, so you may or may not see this section in your organization's Copper setup.
Follow the steps below to add a Lead.

How to Add a Lead:
1. Click on "Leads" in the menu bar
2. Click on "Add New"
3. Enter the necessary and mandatory fields
4. Click "Save" to create the new lead
Converting a Lead
Your Leads are a list of unqualified relationships. As soon as they become qualified, you can convert them to a Person and an Opportunity to track any deals or processes they're involved with.
When should you convert a Lead into a Person? That will depend on how your organization functions. Some examples of conversion points include when a Lead requests a quote or when a Lead schedules a phone call.
Note, Copper admins can choose to disable to Leads section altogether so if you don't see it, ask you admin if it's active.
Follow the steps below to convert a Lead.

How to Convert a Lead:
1. Click on "Leads" in the menu bar
2. Select the lead you want to convert
3. A details panel will appear on the right-hand side of the screen. Click on the "Convert Lead" button at the top of the panel.
4. A window will open in the middle of the screen where you can adjust the data that is related to the lead
5. Click "Convert" to convert the lead
6. By converting the lead you will create three separate records: Person, Company, and Opportunity.
Updating an Opportunity Stage
In Copper, an Opportunity represents a chance to complete a process, such as a sale, an investment opportunity, order fulfillment, or any other process you organization does repeatedly. We track the development of Opportunities using Pipeline stages. For example, you might have a sales opportunity that moves through the stages of a sales pipeline. Those stages might include Product Demo, Quote Requested, Negotiation, and Contract Signed. By indicating which stage your opportunity is currently in, we gain visibility on how your opportunities are developing.
Your Copper admin can edit the pipeline stages and create new pipelines. For example, you could have one pipeline for New Sales and another for Contract Renewals.
Follow the steps below to update an Opportunity stage.

How to Update an Opportunity Stage:
1. Click on "Opportunity" in the menu bar
2. Select the opportunity tile you would like to update
3. Click and drag the opportunity to the new stage
Updating an Opportunity Status
Now we know that Opportunities move through Pipeline Stages. We can also indicate whether an Opportunity was Won, Lost, or Abandoned. This helps us gain insight on our Opportunities - at which stage do we lose the most opportunities? How many deals did we close at the Quote Requested stage? Before we find out, we have to log the outcome, or status, of each opportunity.
Follow the steps below to update an opportunity status.

How to Update an Opportunity Status:
1. Click on "Opportunity" in the menu bar
2. Select the opportunity tile you would like to update
3. Click and drag the opportunity to the status/outcome that applies
4. Select an outcome reason, and leave a note on the opportunity
4. Click "Save" to update the opportunity status
Create a Task
Tasks are the to-dos on your to-do list. In Copper, you can associate a task with a specific Person, Lead, Company, or Opportunity. You can also assign tasks to other Copper users in your organization. Tasks will appear in your Copper dashboard, as well as in your Google Calendar base on the assigned due date.
Follow the steps below to create a Task.

How to Create a Task:
1.Click "Task" on the left-hand menu bar to view your task library
2. On the top right-hand side of your screen, click on the " + " icon
3. Click "New Task"
4. In the pop-up window, enter related information, such as the task owner and the due date
5. Click "Save" to create the new task
How to Mark a Task as Complete:
1. Click "Task" on the left-hand menu bar to view your task library
2. Locate your task and hover over its icon. Click the checkbox to mark it as complete.

Deal Management Recap
Congratulations! You just learned how to:
- Add a Lead to track and manage relationships
- Convert a Lead into an Opportunity to track its progress
- Update an Opportunity Stage to move it along your pipeline
- Update an Opportunity Status to identify which ones have been Lost, Won, or Abandoned
- Create a Task track your to-dos
Next up: Project and Task Management
Project and Task Management
Create a Project
Copper's Projects features helps you keep track of any projects your organization might have. Unlike Opportunities, they don't have to fit into linear pipelines - they are simply "Open" or "Complete."
A Project in Copper lets you keep track of any corresponding Tasks and Activities. You can also collaborate with your teammates by @mentioning them in the activity feed or sharing documents.
Follow the steps below to create a Project in Copper.

How to Create a New Project:
- Go to the Projects tab in the navigation bar on the left side
- Click the "Add New" button
- Enter your project details and click "Save"
Create a Task
Once you have a Project open, you can also add tasks that help you break down the project into small steps.
Follow the steps below to create a Task.
How to Create a Task:
1. Start off by clicking into "Task" on the left-hand menu bar, this will bring you to your task library
2. On the top right-hand side of your screen click on the " + " icon
3. Click "New Task"
4. A panel will appear and you can fill out all of the information related to this task, such as the owner, and the due date
5. Click "save" to create the new task
Filter Projects by Status
To view only Projects marked as "Open" or "Completed" you can apply a filter. Follow the steps below to filter your Projects by status.

How to Filter by Projects by Status:
1. Click on "Projects" in the menu bar
2. Click on the "Filter" icon on the right-hand side of the page
3. Select the "Status" you wish to filter by
4. Save the filter by giving it a name and clicking "Save"
Project and Task Management Recap
Congratulations! You just learned how to:
- Create a Project in Copper to manage it and collaborate with other users
- Create a Task to manage to-dos and deadlines for a Project
- Filter Projects by status to see which ones are open or complete
Click here to learn more about our newly revamped project management tool!
Next up: Personal Preferences
Personal Preferences
Email Visibility Settings
Copper automatically logs emails sent between Copper users and your People and Leads. It shows the date, time, and recipients of those emails in the activity feed of a Lead, Person, Company, or Opportunity record. Whether your fellow Copper users can see the contents of your emails depends on two thing:
- Whether your admin's setting allows for individual users to select their email visibility settings, and
- Your email visibility settings
If your admin allows individual email settings, you can choose your preferences by following the steps below.

How to Change Your Email Visibility Settings:
- Go to Settings > Email Settings & Templates. Make sure you're in the "Preferences" tab
- Check or uncheck the box called "Mark synced emails public by default"
Note, you can mark individual emails private by going to the Activity feed of a Lead or Person.
Notification Settings
Copper notifies you when something happens through email, in the web app, and in the mobile app. You can adjust your notification preferences from the web app by going to Settings > Notifications.

Personal Preferences Recap
Congratulations! You just learned how to:
- Customize Email Visibility
- Adjust Notification Settings
Next up: Additional Support
Additional Support
Additional Copper Resources
We offer several resources to help you make the most out of Copper!
-
- In-App Guides
- In-App Technical Chat Support