


Introduction
Welcome to Copper! 🎉
We are so excited to have you. Our goal is to enable you and your organization to:
✅Manage your contacts
✅Manage your deals
✅Manage your projects
This course is designed to teach you, the Copper admin, how to customize your Copper system to match your organization's needs. If you have any questions, we have many resources listed in the "Additional Support" section, including our help center, weekly webinars, and appointments with our product experts.
Let's get started! Click the pink Next button at the bottom of your screen to navigate.
Getting Started with Copper CRM
✋ Are you a new user? We strongly recommend installing our Chrome extension. This allows you to access Copper from within Gmail and Google Calendar!
There are three ways to access Copper:
- Through the web app
- With our Chrome extension
- Our Android and iOS mobile app
As an admin, you'll customize Copper settings through the web app. However, for day-to-day use we recommend the Chrome extension, which allows you to add contacts, manage deals, and complete tasks without ever leaving your Gmail inbox!
Download the extension now and take the first step to making Copper work for you!
👉 DOWNLOAD THE CHROME EXTENSION NOW 👈
What is a CRM?
CRM stands for “Customer Relationship Management” which is an approach to managing a company's interactions with current and potential customers. It uses customer history and data analysis to improve business relationships with customers.
Copper’s mission, as a CRM, is to help companies grow by freeing individuals to do the work humans do best.
Measuring the Success of your CRM:
The training resources that Copper offers will allow you to set up Copper so that you can easily do the following:
- Effective Customer Relationship Management
- Measurable Deal Management
- Proactively Manage your Projects & Tasks
Ramping Up with Copper
Copper Onboarding Webinar
Whether this is your first time using a CRM system or you are a seasoned veteran, we recommend you start your journey with Copper by attending our weekly Admin onboarding webinar.
Below is a chart of the record types that live within Copper. We will also review these terms in the Onboarding Webinar.
| Terms | Definitions | Additional Details |
| Lead | Unqualified new relationship | Someone who submits an inquiry on your website, or a contact you intend to cold call |
| Company | Qualified organization within your business network | A way to group multiple People records by Company |
| Person | Qualified contact within your business network | People records can be segmented by contact type |
| Opportunity | Revenue potential associated with a Person/Company | Opportunities can also represent any linear repeatable process you’d like to track - Not limited to sales deals |
| Project | A broad initiative to complete | Projects can be related to People, Companies, or Opportunities |
| Task | A single action item | Tasks can be related to Leads, People, Companies, or Opportunities |
Once you have completed the webinar, move forward with this course!
UP NEXT: Contact Management Features
Contact Management
Create a New Contact Type
Copper lets you categorize People records into different categories called Contact Types. This is useful for segmenting your People. For example, you can filter all the Potential Customers and send email outreach in bulk. Bulk email outreach will be covered in an upcoming section.
By default, Contact Types include Current Customer and Potential customer. You can add a new Contact Type by following the steps below.

How to Create a New Contact Type:
1. Click on "Settings" in the menu bar on the left-hand side of the page
2. Expand the "Customize" section
3. Under this section, click "Contact Type"
4. On the right-hand side of the page, click on the "Create Contact Type" button
5. Enter the name of your new Contact category
6. Click "Ok" to save your new contact type
Create an Activity Type
In addition to automatically logging emails, Copper allows your team to log interactions and activities. Users are able to log activities on any Lead, Person, Company, or Opportunity. By default, the Activity types are Phone Call, Meeting, and Busywork. You can add a new Activity Type, such as Proposal Review, by following the steps below.

How to Create an Activity Type:
1. Click on "Settings" in the menu bar on the left-hand side of the page
2. Expand the "Customize" section
3. Under this section, click "Manage Activity Types"
4. On the right-hand side of the page, click on the "Create New Activity Type" button
5. Type in what you would like to call your new activity type in the text field
6. Click "Ok" to save your new activity type
Create Custom Fields
Fields are where you store information about a Lead, Person, or Opportunity. For example, "Work Email" and "Title" are fields you can fill out for a Person record. Copper comes with pre-made fields, but you create custom ones as well. For example, you might want to add a dropdown field for Industry or a checkbox to indicate if someone is a VIP customer.
Follow the steps below to create a new Custom Field.

How to Create a Custom Field:
1. Click on "Settings" in the menu bar on the left-hand side of the page
2. Expand the "Customize" section
3. Under this section, click "Manage Fields On Records"
4. At the top of the page, select the record you would like to create a field on
5. On the right-hand side of the page, click on the "Create Field" button
6. Under "Type" select what kind of custom field you would like to use
7. Type in what you would like to call your custom field in the "Label" text field
8. Click "Ok" to save your new activity type
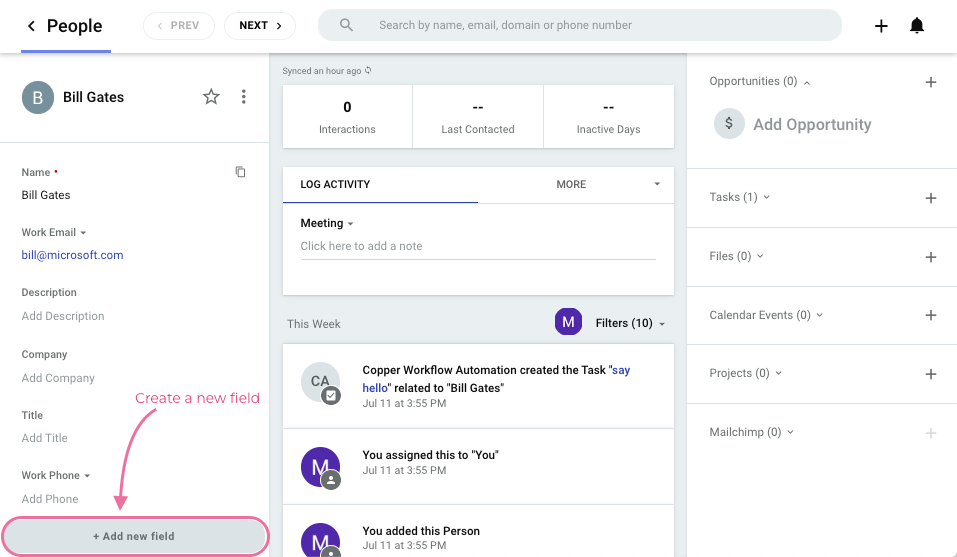
You can also create a new field while viewing a record!
Create an Email Template
If your team sends similar emails over and over again, email templates can reduce some of that repetitive data entry. They let you save an email template in advance so that you can send it with just a few clicks. Combine it with Merge Fields, which insert the recipient's name or other information, for fast and personalized emails.

How to Create an Email Template:
1. Click on "Settings" in the menu bar on the left-hand side of the page
2. Expand the "Personal Preferences" section
3. Under this section, click "Email Settings & Templates"
4. Make sure you are in the "My Templates" section of the page
5. On the right-hand side of the page, click on the "Create Template" button
6. Name your template, and identify what content is in the template.
7. Fill out the body of the email template and use the + icon on the right-hand side of the panel to add in any merge fields
8. Click "Save" to save the template under your "My Templates" section
Create and Add a Tag
Tags are a handy way to store labels of information about a Lead, Person or Company that don't belong in your other fields. For example, you can add a tag for everyone you met at a particular event. You can then use a filter, which we'll cover in the Reporting section, to send an email template to all relevant contacts at the same time.
To create a Tag, follow the steps below.

How to Create and Add a Tag:
1. Open the record you would like to add the tag for. In our example, we are opening a Person.
2. Under the "Details" section of the record scroll down to "Tags"
3. Type in the text field to add a Tag or select one from the dropdown of previously used tags
Contact Management Features Recap
Congratulations! You just learned how to:
- Create a Contact Type to categorize your relationships
- Create an Activity Type to categorize your interactions
- Create a Custom Field to customize the information you capture and track
- Create an Email Template to streamline your communications
- Create a Tag to segment your Leads and People
Next up: Deal management!
Deal Management
Create a Pipeline
In Copper, you can use Pipelines to track how far along Opportunities are in your organization's process. Pipelines and Opportunities are most commonly used to track sales. However, you can use them to manage any linear repeatable process such as recruitment, order fulfillment, or sponsorship deals.
Copper lets you create and customize multiple Pipelines for your organization's processes. Create a new Pipeline using the steps below.

How to Create a New Pipeline:
1. Start on the "Opportunities" record
2. In the top left-hand corner of the screen you will see your pipeline called "Sales" with a drop-down arrow next to it
3. Click on "Sales" to expand the menu
4. Click "+ Create New Pipeline"
5. Type in the name of each stage in the pipeline under the "Stage Name" column
6. Add additional stages using the "+ Add Stage" option at the bottom of the column
7. Click "Save" to save this pipeline
8. Switch between pipelines by selecting the pipeline name in the top left-hand corner of the page, and selecting the pipeline you would like to view
Create Custom Fields
Fields are where you store information about a Lead, Person, or Opportunity. For example, "Work Email" and "Title" are fields you can fill out for a Person record. Copper comes with pre-made fields, but you create custom ones as well. For example, you might want to add a dropdown field for Industry or a checkbox to indicate if someone is a VIP.
Follow the steps below to create a new custom field.
How to Create a Custom Field:
1. Click on "Settings" in the menu bar on the left-hand side of the page
2. Expand the "Customize" section
3. Under this section, click "Manage Fields On Records"
4. At the top of the page, select the record you would like to create a field on
5. On the right-hand side of the page, click on the "Create Field" button
6. Under "Type" select what kind of custom field you would like to use
7. Type in what you would like to call your custom field in the "Label" text field
8. Click "Ok" to save your new activity type
Create Lead and Opportunity Sources
Lead and Opportunity Sources help you keep track of where your Opportunities are coming from so you can optimize your processes. How many of your Leads come from online advertising or from referrals? To find out, your team should fill out the Source for each new Lead or Opportunity.
Copper's default Sources are Email, Cold Call and Advertising. You can create a new Source category by following the steps below.

How to Create a New Lead and Opportunity Source:
1. Click on "Settings" in the menu bar on the left-hand side of the page
2. Expand the "Customize" section
3. Under Customize > Opportunites click on "Sources"
4. On the right-hand side of the page, click on the "Create Source" button
5. Type in what you would like to call your source type in the text field
6. Click "Ok" to save your new source type
Create Loss Reasons
When you change an Opportunity's status to Lost, Copper asks for the Loss Reason. This allows you to analyze why your deals are falling through. For example, how many deals are you losing due to competitors or to a lack of product features? Cataloguing your Loss Reasons can help you gain insight on how to improve your processes or products.
By default, the Loss Reasons are Price, Features, and Competitors. You can add a new Loss Reason, such as Budget Change, by following the steps below.

How to Create Loss Reason:
1. Click on "Settings" in the menu bar on the left-hand side of the page
2. Expand the "Customize" section
3. Under Customize/Opportunity click on "Loss Reasons"
4. On the right-hand side of the page, click on the "Create Loss Reason" button
5. Type in what you would like to call your new loss reason in the text field
6. Click "Ok" to save your new loss reason
Create Lead Statuses
Lead Statuses let you categorize your Leads. They can be useful to know who to reach out to. For example, Leads marked as "Unqualified" probably won't end up doing business with you, while you may want to speak to leads that are "New".
By default, the Lead Statuses are New, Open, Unqualified, and Junk. You can customize your Lead Statuses for your business. To add a new Lead Status, follow the steps below.

How to Create a New Lead Status:
1. Click on "Settings" in the menu bar on the left-hand side of the page
2. Expand the "Customize" section
3. Under Customize > Leads click on "Lead Statuses"
4. On the right-hand side of the page, click on the "Add New Status" button
5. Type in what you would like to call your new lead status in the text field
6. Click "Ok" to save your new lead status
Deal Management Feature Recap
Congratulations! You just learned how to:
- Create a Pipeline to track your Opportunities
- Create Sources to track where your Leads and Opportunities are coming from
- Create Loss Reasons to help understand why you might be losing Opportunities
- Create Lead Statuses to categorize potential business and relationships
Next up: Project and Task Management
Project and Task Management
Create an Activity Type
Activity Types help your team categorize the kind of work they're doing with a Lead, Person, Opportunity, or Project. By default, the Activity Types are Phone Call, Meeting, and Busywork. You might want additional categories like On-Site Visit, Proposal Review, or just "Other". Follow the steps below to create a new Activity Type.

How to Create Activity Type:
1. Click on "Settings" in the menu bar on the left-hand side of the page
2. Expand the "Customize" section
3. Under this section, click "Manage Activity Types"
4. On the right-hand side of the page, click on the "Create New Activity Type" button
5. Type in what you would like to call your new activity type in the text field
6. Click "Ok" to save your new activity type
Create a Task
In Copper, you can assign Tasks for yourself or to another Copper user to keep track of to-dos. Once a Task is created, Copper will send out a notification and add it to the Task owner's Google Calendar.
Follow the steps below to create a Task.

How to Create a Task:
1. Start off by clicking into "Task" on the left-hand menu bar. This will bring you to your task library
2. On the top right-hand side of your screen click on the " + " icon
3. Click "New Task"
4. A panel will appear and you can fill out all of the information related to this task, such as the owner and the due date
5. Click "Save" to create the new task
Complete a Task
Once you've completed a Task, you can mark it as complete it Copper.

How to Mark a Task as Complete:
1. Go to the "Task" on the left-hand menu bar to access your task list.
2. Hover over the task's symbol and click the checkbox.
3. Congratulations! Your Task is now complete.
Project and Task Management Feature Recap
Congratulations! You just learned how to:
- Create an Activity Type to track the work you do on Projects
- Create a Task to remind yourself or your colleague to do something
- Mark a Task as Complete to check it off your list
Click here to learn more about our newly revamped project management tool!
Next up: Importing Your Data
Importing Your Data
Data Import Webinar
Getting your data into Copper is what allows you to use the functionalities that you just spent time setting up. Please sign up for our Data Import Webinar to make sure you get it right the first time!
In order to prepare for the import webinar, please feel free to reference our importing help center articles .
Import Your Data into Copper
Step 1:
Now that you have attended one of our Data Import Webinars, you are ready to start formatting your data so that it reflects your Copper settings.
We have created a template for you to assist with this: Data Import Template
| RECALL: Custom Fields You may have data points in your legacy data that are not currently reflected in Copper. In order to map all data points into Copper, you may need to create custom fields on certain record objects. If you would like to review how to create Custom Fields, please reference the video included earlier in this course. |
Step 2:
The time has come to import your data! Follow the steps from the Data Import Webinar and reference the Data Import Template from Step 1
Once you have completed the webinar, move forward with this course!
UP NEXT: Reporting In Copper
Reporting in Copper
In-App Reporting
Copper gives you insights on your team's performance via our In-App Reports. You can customize these reports by selecting which Pipeline or time period you'd like to examine, or by applying a filter to the report data.

How to Access In-App Reports:
1. Start off by clicking on "Reports" in the left-hand menu bar
2. A library of all the different Copper reports will populate
3. Click into the report type that suits your business needs
4. Use the filters at the top of the report type to customize your view of the data
Filtering Your Data
Filtering your data allows you to report on specific records. For example, if you'd only like to see a list of current customers, you can apply a filter that selects only People whose contact type is "Current Customer". You can apply multiple criteria in a filter and you can save it to see the same view later on.
Each user can create and save their own "Private" filters or share them with the team by marking them as "Public." For example, each member of a sales team might have a private filter that shows clients that they own. The team might also have a filter that shows all current customers who were added in the past month.

How to Filter Your Data:
1. Start off by clicking into any of your Copper records, this example is using "People"
2. On the top right-hand side of your screen, click on the filter icon
3. Apply whichever filters suit your need
4. Collapse the filter panel to see your filtered data
Reporting in Copper Recap
Congratulations! You just learned how to:
- Use and customize in-app reports to analyze your team's Opportunities and Activities
- Filter your data to see exactly the records you are looking for
Next up: Personal Preferences
Personal Preferences
Team Permissions
You can create teams within Copper and control what information each team has access to. Within each team you can identify Team Members and Team Managers. By breaking your users out into teams, you can increase productivity organization by ensuring your users only see what they need to do their job. 
Change Your Team Permission Settings Steps:
- Go to Settings > Team. Select the "Visibility and Permissions" section.
- Click on "Activate Team Permissions"
- Click "Activate" on the panel that appears on your screen
- Click on "Create New Team"
- Name your team and click "Save"
- Click "view" to view the team
- Click "add team member" to add users to the team and click "Save"
Email Visibility
Copper automatically logs emails sent between Copper users and your People and Leads. By default, Copper doesn't show the content of those emails to your users - only the time and recipient list of those emails. But what if you and your team need more visibility on emails?
There are three types of settings for Email Visibility:
- Your Email Visibility - do you want other Copper users to be able to see your emails by default? If so, follow the steps in the animation below.
- Admin Private Email Visibility - if someone else marks their email as private, do you still want to be able to see it? If so, check this box. Note, only the Account Owner can adjust this setting.
- Individual Email Visibility Control - do you want your Copper users to allow their teammates to see their emails by default? If so, check this box. Note, only Admins can adjust this setting.
Keep in mind, these options affect the default visibility; you or your colleagues can still mark individual emails as private.

How to Change Your Email Visibility Settings Steps:
- Go to Settings > Email Settings & Templates. Make sure you are on the "Preferences" tab.
- Check or uncheck the box called "Mark synced emails public by default." This allows you to choose whether other Copper users can see the emails between you and your Copper People and Leads.
** Note, you can mark individual emails private by going to the Activity feed of a Person or Lead. **
Notification Settings
Copper notifies you when something happens through email, in the web app, and in the mobile app. You can adjust your notification preferences from the web app by going to Settings > Notifications.

Personal Preferences Recap
Congratulations! You just learned how to:
- Set up Team Permissions
- Customize Email Visibility
- Adjust Notification Settings
Next up: Additional Support
Additional Support
Support and Advanced Topics
Resources to help you make the most of Copper!
- Training Webinars for additional live training
- Copper Help Center for educational articles
Need an integration? Explore options below:
Explore how other companies are making the most of Copper.
UP NEXT: Train Your Team
Train Your Team
Get your team up and running with Copper!
- Have your users complete the "New User Training Course" course available on Copper Community and in the Help Center.
- While your users completing training, check out our Change Management Resources in the help center. Use these to explain how Copper will be used to support your business!
Explore how other companies are making the most of Copper.
UP NEXT: Case Studies
Case Studies
See the attachment for a list of case studies!