


Hello! This article is part of our quick start series. Here, we’ll run through the key customizations to make Copper first your organization.
We will cover:
Have questions? Add them as a comment to this article and we’ll get you an answer. Happy customizing!
Contact Types
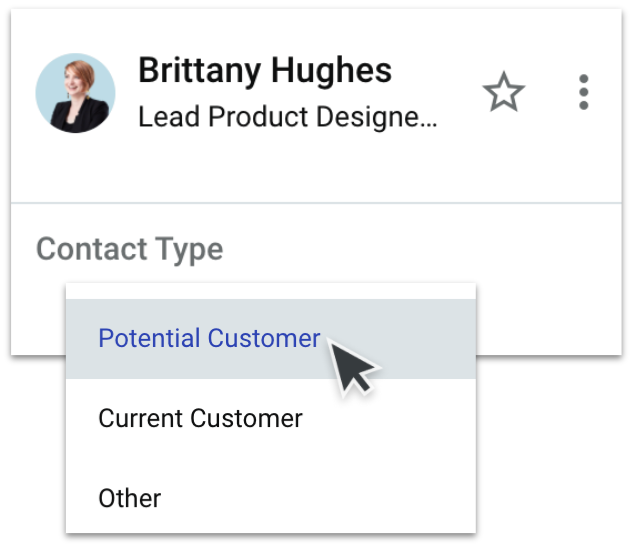
Contact Types let you categorize relationships with People and Companies. When you open a Person or Company record, you’ll see a dropdown for Contact Type in the details panel.
Here are the default Contact Types in the system:
- Potential Customer
- Current Customer
- Other
You can edit your dropdown options based on the relationships and terms your organization uses. Some common examples of custom dropdown options include Vendor, Investor, Donor, Target Customer and so on.
![]() Go to Settings > Customize > People > Contact Types to customize your Contact Types.
Go to Settings > Customize > People > Contact Types to customize your Contact Types.
Click here to learn about Contact Types in more detail.
Activity Types
By default, Copper logs any emails or meetings your team has had with a contact through our G Suite / Google Workspace integration. But if your team prefers to log specific types of activities, they can easily do so through the Activity Feed on a Person, Company or Opportunity.
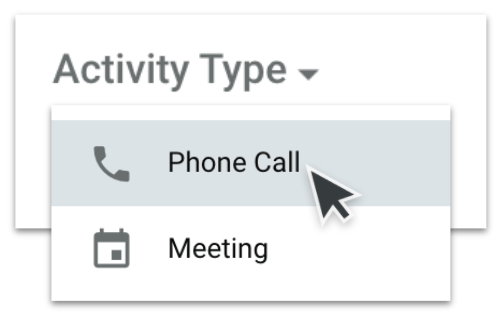
By default, Copper has Activity Types for:
- Phone Call
- Meeting
Build and edit your dropdown options based on how your team interacts with contacts. Common activity types include Demo, Site Visit and Consultation Call.
![]() Go to Settings > Customize > Manage Activity Types to customize your Activity Types.
Go to Settings > Customize > Manage Activity Types to customize your Activity Types.
You can also choose whether each Activity Type counts as an interaction. This means that activity will count towards that Person, Company, or Opportunity’s interaction stats.
Click here to learn about Activity Types in more detail.
Sources
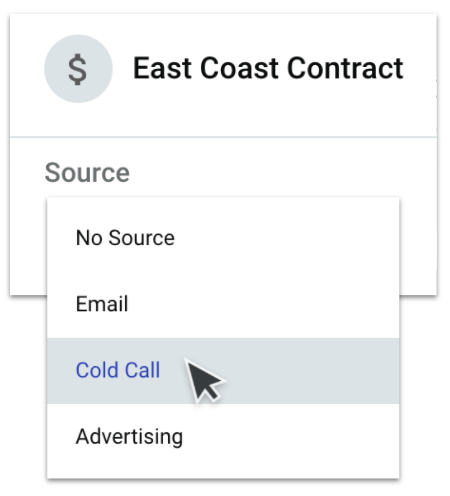
Each Opportunity has a dropdown for Source so that you can track where your deals are coming from and which channels are most effective.
By default, Copper has Source options for:
- Cold Call
- Advertising
Add and edit the Sources based on how your organization obtains new opportunities. Common dropdown options include Conference, Referral and Webinar.
![]() Go to Settings > Customize > Pipelines > Opportunity Sources to customize your Source options.
Go to Settings > Customize > Pipelines > Opportunity Sources to customize your Source options.
Click here to learn about Sources in more detail.
Pipelines

In Copper, a Pipeline refers to a set of stages that an Opportunity progresses through. The further along the Pipeline an Opportunity is, the closer a deal is to being completed.
When designing your Pipelines, think about:
- What processes will we track in Copper? (Each one will become a separate pipeline)
- What stages are involved in each of these processes?
These two questions will give you a sense of which pipelines to build, and what the stages within them should look like. As a best practice, we recommend creating 3 to 6 stages in a Pipeline, although you can have more or less depending on your processes.
![]() Go to Settings > Customize > Pipelines > Stages to edit a Pipeline or to create a new one.
Go to Settings > Customize > Pipelines > Stages to edit a Pipeline or to create a new one.
You can assign a win probability for each stage. These values are optional and are used to generate forecasting reports.
Click here to learn more about customizing Pipelines.
Opportunity Loss Reasons
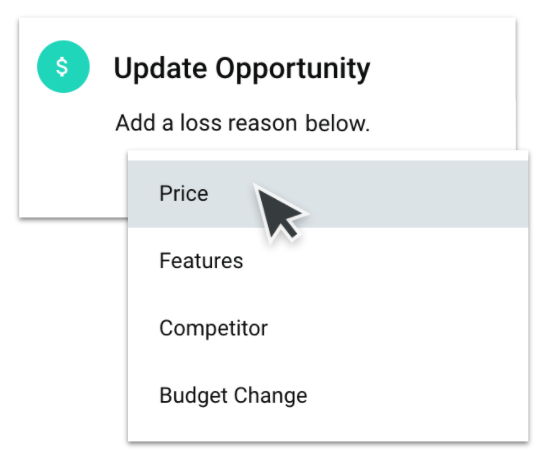
When you mark an Opportunity as Lost, Copper will prompt you to select a Loss Reason. This helps you track why your Opportunities aren’t going through and may point to areas for improvement.
By default, Copper lists these Loss Reasons:
- Price
- Features
- Competitor
- Budget Change
Customize your Loss Reasons based on the reasons why an Opportunity might fall through. Common options include Poor Qualification or Bad Timing.
![]() Go to Settings > Customize > Pipelines > Opportunity Loss Reasons to customize your Loss Reason options.
Go to Settings > Customize > Pipelines > Opportunity Loss Reasons to customize your Loss Reason options.
Click here to learn more about Loss Reasons.
Default fields & custom fields
Copper has certain fields for each record type by default. However, you can add custom fields to store additional information. Say you want to keep track of what industry each Company works in. You could add a custom dropdown field called Industry to store that information.
How do you know what kinds of custom fields to create? Think about the type of information your team needs on hand when they’re working day-to-day. What data do they need about People, Companies and Opportunities?
![]() To create a custom field:
To create a custom field:
- Go to Settings > Customization > Manage Fields on Records.
- Select the record type you’d like to add the custom field on. For example, if you want to add a dropdown to Companies, click on Companies.
- Click Create Field.
- A popup opens with configuration options, including the field type (e.g. checkbox or dropdown) and the label (i.e. the name of the field).
Or create it while viewing a record!

Note that there will be a space to enter Field Key, which you can leave blank until you set up a Workflow Automation.
Here are some common examples of custom fields:
- A dropdown for “Industry” on the Company records
- A checkbox for “VIP” on the People records
- A currency value for “Deposit Amount” on the Opportunity records
Click here to read more about the different types of custom fields.
Once you’ve added your custom fields, you can:
- Rearrange them by dragging and dropping them.
- Add collapsible sections by clicking the Add Section button.
- Deactivate them by clicking the minus sign to the right of a field name.
- Edit, delete, or apply them to another record type by clicking Edit Custom Fields in the top right corner.
Optional: Leads
The Leads is a place to store your cold or unqualified contacts if you prefer to keep them separate from your main People list. When you’ve determined that a Lead has business potential, you can convert them into a Person and Opportunity using the Convert Lead button.
When deciding whether to activate the Leads section, ask yourself the following questions:
- Does my team work through a large number of cold or unqualified contacts?
- Do we have a qualification process for those cold contacts?
If the answer was yes to those questions, consider turning on the Leads section.
The most common use case for the Leads section is to keep track of inbound and outbound lead development. For example, you might store the information for anyone who filled out a form on your website or whose business card you grabbed from an event.
![]() Go to Settings > Customize > Leads > Lead Statuses > Enable Leads to turn on the Leads section.
Go to Settings > Customize > Leads > Lead Statuses > Enable Leads to turn on the Leads section.
Once Leads have been enabled, you can customize a list of Lead Statuses. This allows you to categorize your Leads by where they are in the qualification process. By default, the Leads Statuses are:
- New
- Open
- Unqualified
- Unresponsive
![]() Go to Settings > Customize > Leads > Lead Statuses > Enable Leads to customize your Lead Statuses.
Go to Settings > Customize > Leads > Lead Statuses > Enable Leads to customize your Lead Statuses.
Optional: Team Visibility & Permissions
As an admin, you can determine which users can see what using our Team Visibility & Permissions. There are two parts to this:
- Creating a team
- Applying Team Visibility & Permissions
Creating a team
A team is how you can group users together. It’s very common to create Teams in Copper based on how your organization is structured. For example, you might create a Sales Team and an Account Management Team.
![]() To create a team, go to Settings > Team > Visibility & Permissions > Create New Team.
To create a team, go to Settings > Team > Visibility & Permissions > Create New Team.
Once a team is set up, you can set their Visibility & Permissions.
Team Visibility & Permissions
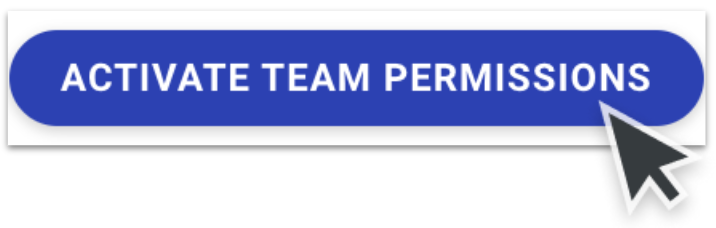
Visibility & Permissions is how you determine which Teams have access to what. Start by activating Team Permissions in your Copper system. This will take the rules you’re about to set up and apply them to the team members.
![]() To activate Team Permissions, go to Settings > Team > Visibility & Permissions > Activate Team Permissions.
To activate Team Permissions, go to Settings > Team > Visibility & Permissions > Activate Team Permissions.
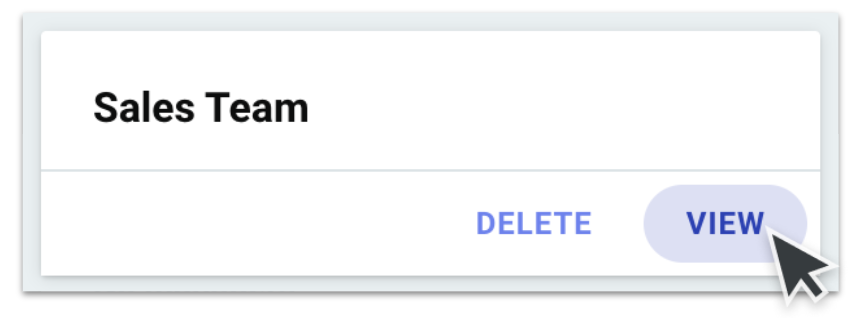
Next, look at the card for one of your teams and click View. Select Access & Visibility to adjust your options.
![]() To configure Team Permissions, go to Settings > Team > View Team > Access & Visibility.
To configure Team Permissions, go to Settings > Team > View Team > Access & Visibility.
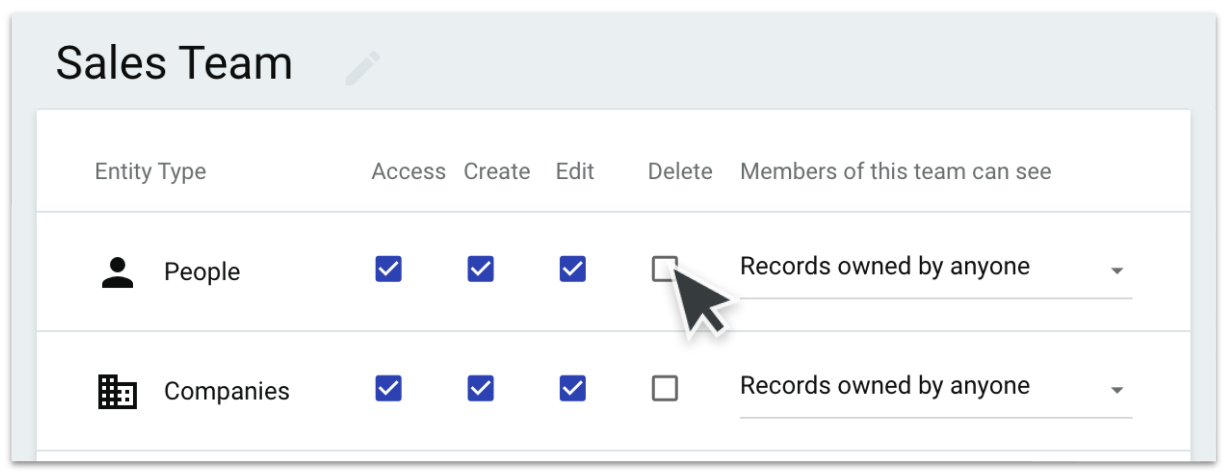
As a best practice, we recommend removing every Team’s ability to delete records.
Note, it’s also possible to set visibility permissions on a per-record basis. Read this article for more details.
Your Copper resources
Here are all the resources available to you as a Copper customer.
- This setup guide: You’ve chosen a great place to start. Continue reading for step-by-step instructions for setting up your Copper system.
- Copper Community: This is where you’ll find a mix of product experts and customers discussing questions, use cases and best practices. It’s a great place to go if you have questions.
- Webinars & Events: We host regular Q&As - come join us to talk to a Copper expert!
- In-app chat: Our technical team can also help with your questions. Contact them by opening the Copper web app and using the chat icon in the lower right corner.
